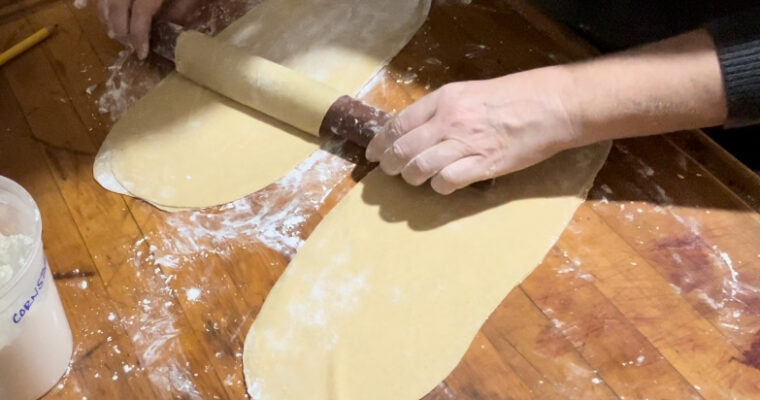
Category: Vegan Recipes

Sourdough pizza

Sourdough pizza

Today, I’m sharing my journey of crafting a crispy yet chewy pizza crust from scratch, using wholesome ingredients and a touch of sourdough magic.

Whisked Italian Bread, Ciabatta Rolls, and English Muffin Loaf

Whisked Italian Bread, Ciabatta Rolls, and English Muffin Loaf

This versatile recipe can be used to make excellent Ciabatta rolls, English Muffin bread, or artisan open bake crusty bread with a soft crumb, and big holes.

Pumpernickel Whole Grain Pretzel Sticks

Pumpernickel Whole Grain Pretzel Sticks

Pumpernickel pretzel sticks in a cup for snack.

Hey there, pretzel enthusiasts! Buckle up because I’ve got another mouthwatering pretzel stick variation that’ll knock your socks off—introducing my favorite twist: Pumpernickel Pretzel Sticks!

Let’s Talk Pumpernickel

Pumpernickel isn’t just any old grain—it’s hearty whole grain rye, freshly milled to perfection. You can go full-on rye for a robust flavor, or mix in some hard wheat for extra oomph.

But wait, the magic of pumpernickel isn’t just in the rye—it’s a symphony of flavors. Picture this: rich molasses, earthy caraway seeds, and a hint of cocoa powder. We’ve jazzed it up with a touch of onion and garlic powder (optional, of course). Feeling adventurous? Swap some water for pickle juice—it’s a game-changer!

Making Waves

These pretzels follow the same golden rules as my original crunchy sticks—mill your grains, mix in the dry goods, and measure out the wet stuff. Load up your trusty extruder, hit start, and slowly pour in the wet mix through the extruder’s lid. The rest? Standard procedure—baking soda bath, a sprinkle of pretzel or coarse sea salt, bake until golden, then dehydrate till they snap!

The Equipment

The Philips Avance Pasta Extruder is one of the best purchases I’ve made. It extrudes all the shapes I need, and the bronze dies from pastidea.com make the end result just perfect in every way. The pasta isn’t too thick, and turns out just right every time. Plus you can make biscuit cookies and pretzel sticks in the extruder, which is awesome!

Excalibur makes dehydrators that last forever. My 4-tray was bought used over 15 years ago and still runs great for my mom who uses it to dry peppermint for tea. I upgraded to a 9-tray and use it for MANY things – from drying wool clothes, to proofing bread dough in winter, to making crackers and pretzels stay crunchy!

Dip, Dip Hooray!

Now, last time I dished out a honey mustard dressing, but today calls for a different vibe—ranch dressing! Why? Because we’re all about mixing it up. Imagine these beauties paired with cool ranch or a creamy spinach artichoke dip—it’s a flavor explosion waiting to happen.

Here’s the scoop on how to whip up your own batch:

Pumpernickel pretzel sticks in a cup for snack.

Pumpernickel Whole Grain Pretzel Sticks

Just Mill It
Fresh milled whole grain pumpernickel pretzel sticks that taste amazing and stay crunchy!
5 from 1 vote
Prep Time 15 minutes
Cook Time 8 minutes
Total Time 23 minutes
Course Snack
Cuisine American
Servings 20
Calories 109 kcal

Equipment

Ingredients
  

Baking Soda Wash

  • 1 tbsp baking soda
  • 1 cup water

Ranch Dressing

  • ½ cup plain yogurt or sour cream
  • ¼ cup sour cream or homemade mayo
  • 1-2 cloves garlic minced
  • 2 tablespoons fresh chives finely chopped
  • 1 tablespoon fresh parsley finely chopped
  • 1 tablespoon fresh dill finely chopped (or 1 teaspoon dried dill)
  • 1 tablespoon fresh lemon juice
  • ¼ teaspoon onion powder
  • Salt and freshly ground black pepper to taste

Instructions
 

  • Mill the grains into flour.
  • Preheat oven to 450 F convection
  • Add baking powder, salt, cocoa, garlic and onion powder to the flour
  • Measure the remaining ingredients (olive oil, sweetener, and water) into a small measuring cup or jar, mixing to combine.

Extruding Pretzel Dough

  • Remove the front face of the exturder, and place the Grissini die into the adapter for your pasta maker, attaching it to the extruder. Put the pasta machine back together.
  • Add the dry mixture to the mixing container of your pasta extruder
  • Turn on your pasta extruder and pick the larger batch size. Press the Play button.
  • Add the wet mixture through the well on the top lid, which lets the ingredients slowly mix together.
  • Optional: Once the extruder stops and changes direction, turn off the machine and then turn it back on again. Select the big batch size, and press the play button.
  • As the dough extrudes, cut the dough to the length you prefer.
  • Set the dough on a parchment lined tray, with space between the pretzel sticks. If they are curled at the ends, gently roll them on the pan and they will straighten out.

Baking Soda Wash

  • Mix together the water and baking soda in a spray bottle.
  • Heavily mist the pretzel dough until it is wet on top. Sprinkle the top with pretzel salt or coarse sea salt. Alternatively, you could use a pastry brush and heavily brush the tops with baking soda – but a sprayer will work best.
  • Place the sheet into the oven, and bake for 8 minutes or until as dark as you like. If baking directly on a preheated baking stone, lower the cook time to 5 minutes.
  • They will harden slightly as they cool (but will soften if you put them into a container or bag unless you dehydrate them to take out the excess water).

Stay Crunchy Pretzels

  • Dehydrate the pretzel rods at 125 F for a few hours until crunchy when you snap it in half. I put mine in around 2:30 pm and when I got home around 7 pm they were crispy.
  • Store in a plastic bag until ready to eat. These should keep for several weeks if you dehydrated them until fully dry – but they won't last!

Homemade Ranch Dressing

  • Add ingredients to a bowl, and use whisk or emulsion blender to combine into dressing. Thin out with vinegar or water, if needed.

Video

Notes

  • The molasses CAN be left out, but I’d recommend using at least 10 grams of it, and split the remaining grams between olive oil and water for a less sweet version of this pumpernickel pretzel.
  • For rye pretzels, leave out the cocoa powder and use the directions above for lessening the molasses.

Nutrition

Serving: 34gCalories: 109kcalCarbohydrates: 19gProtein: 3gFat: 3gSaturated Fat: 0.4gPolyunsaturated Fat: 0.3gMonounsaturated Fat: 2gSodium: 466mgPotassium: 22mgFiber: 2gSugar: 4gVitamin A: 1IUVitamin B1: 0.03mgVitamin B2: 0.01mgVitamin B3: 0.3mgVitamin B5: 0.04mgVitamin B6: 0.01mgVitamin E: 0.5mgVitamin K: 2µgCalcium: 48mgIron: 1mg
Keyword extruded, pretzel sticks
Tried this recipe?Let us know how it was!
Crunchy Pretzel Sticks: The Ultimate Recipe

Crunchy Pretzel Sticks: The Ultimate Recipe

I finally cracked the code on making the perfect Crunchy Pretzel Sticks at home! And let me tell you, they’re not just any pretzels—they’re 100% whole grain, freshly milled goodness.

Healthy Tortellini Recipe

Healthy Tortellini Recipe

Impress your family and friends with this simple, yet delicious fresh milled homemade pasta. It freezes well.

The Secret to Whole Wheat Italian Bread without Additives

The Secret to Whole Wheat Italian Bread without Additives

While I munch on this most recent whole wheat, crusty Italian bread, I’m reflecting the secret to rustic Italian Bread without the additives. Over the last few weeks, I’ve made in tons of Italian bread:

My Other Italian Bread Recipes

Vital Wheat Gluten

What these fresh milled, whole grain Italian bread loaves all have in common is the use of Vital Wheat Gluten. It’s an additive I had pretty much eliminated from my baking since I decided to use lower amounts of yudane to get my bread soft, soft, and strong. And I was happy with that!

A few close friends expressed a strong desire for artisan Italian bread made from freshly milled, whole wheat flour. They envisioned a loaf with a crispy exterior, a tender interior, and generously-sized holes. Not only that, they preferred it not to be baked in a Dutch oven. Local bakeries achieve similar results by incorporating high-gluten flour and dough enhancers. Therefore, I developed a whole wheat Italian bread recipe utilizing vital wheat gluten to mimic these qualities.

No Additives Challenge

Once I posted my recipes, folks asked the same questions I usually have:

Can I make authentic fresh-milled Italian bread without the vital wheat gluten, and how?

Those folks inspired me to keep trying with the Italian bread without additives. I’m THRILLED to show you it CAN be done, and it can be GREAT! I nearly neglected the impact of reducing yudane in my soft sandwich loaves, which enabled me to omit vital wheat gluten and lecithin, still maintaining softness and pliability. I’m not sure WHY it didn’t occur to me sooner to try it with this bread.

Thanks to some comments and support from my friend Monique at Lovely Belle Bakes, I was able to:

  • use wire whips to incorporate more air into the Italian bread dough, getting excellent windowpane in minutes. This makes it great for KitchenAid and weaker mixer users
  • incorporate a fridge rise
  • change up the way I shape my Italian bread dough -her tips gave me encouragement to try again. Shaping open bakes (without a pan) has been a personal struggle.

This rustic Italian bread recipe is perfect in every way – the texture of the crumb, how it holds it’s height, and it’s chewy yet crunchy crust. This is a daily loaf winner! I hope you enjoy this whole wheat Italian bread recipe as much as my family and friends do.

freshly milled italian bread without the additives

Crusty Whole Wheat Italian Bread with NO ADDITIVES

Rustic whole wheat Italian bread, for the best big holes. This is wet enough to develop gluten with wire whips or the roller and scraper on the Ankarsrum, at highest speed, to develop gluten before switching to the dough hook (if using whisks). KitchenAid friendly recipe
5 from 1 vote
Print Pin Rate
Course: Side Dish
Cuisine: Italian
Keyword: big holes, chewy bread, crunchy crust, italian bread, soft bread
Prep Time: 10 minutes
Cook Time: 40 minutes
Rest Time: 1 hour
Total Time: 1 hour 50 minutes
Servings: 20 slices
Calories: 80kcal
Author: Just Mill It
Cost: 1.85

Ingredients

Instructions

  • Mill the flour

Prepare Yudane

  • Place a small cup on your scale, adding 25 g of flour to it.
    Put flour on your scale and zero out the scale
  • Zero out the scale, and pour 50 g of BOILING water into the bowl.
  • Quickly mix into a paste, and set aside.

Mixing the dough

  • Add water, yudane, salt, barley malt syrup to your mixing bowl using wire whisks.
  • Turn mixer on low speed, and slowly pour in the flour until incorporated.
  • Kick up the speed of your mixer to highest setting for about five minutes. The dough will change in consistency from a wet batter to dough that starts to grab on and stretch in the bowl. The sound will also change. Once this happens, turn it off.
  • Switch to the dough hook or roller and scraper for the Ankarsrum mixer. Sprinkle in your yeast, and knead the dough by mixer or by hand for about 2 more minutes. The dough is still wet enough that you can do it on a higher speed but it's not necessary.

Fermentation (and stretch and folds)

  • Place your dough into an oiled bowl with room to double in size.
  • Develop some extra structure in your bread by following the directions in the video. This is a special type of stretch and fold for high hydration dough.
  • Let the 30 dough rest for 30 minutes or until doubled.
  • Do another set of stretch and folds.
  • Let your dough rise a second time in your covered bowl IN THE FRIDGE.

Shaping

  • Preheat your oven to 450 F. If using a dutch oven, put it into the oven (the bottom only).
  • Shape your dough, flour it well. Scoring is optional.
  • Transfer the bread to the oven, add a tray of boiling water for steam, and spray the loaf before closing the door.
  • Bake at 450 F for 25 minutes
  • Remove the pan of boiling water or remove the Dutch oven lid, depending on which you are using, and lower the oven temp to 425 F.
  • Set timer for 15 minutes or to your preferred time for desired crust.
  • Remove from the oven and cool on a wire rack fully before slicing.
  • Store in a paper bag, NOT plastic bags or beeswax – they will soften your crust too much. You can also leave this one on the counter, cut side down, if it'll be eaten fast enough.

Video

Nutrition

Serving: 50g | Calories: 80kcal | Carbohydrates: 16g | Protein: 5g | Fat: 0.3g | Saturated Fat: 0.01g | Polyunsaturated Fat: 0.02g | Monounsaturated Fat: 0.02g | Sodium: 216mg | Potassium: 7mg | Fiber: 3g | Sugar: 0.3g | Vitamin C: 0.002mg | Calcium: 14mg | Iron: 1mg
High Hydration Italian Bread with Fresh Flour

High Hydration Italian Bread with Fresh Flour

This Italian bread dough is by far the best I’ve made, at over 120% hydration.  Thanks to using yudane, which is a paste formed by mixing flour with boiling water, I get these really big holes reminiscent of refined flour bakery bread yet enjoy the read more…

100% Spelt Italian Bread (fresh milled)

100% Spelt Italian Bread (fresh milled)

A rustic, crusty taste of Italy packs a nutritional punch with our Italian bread. Can be made with no additives!

Soft and Chewy Crusty Italian Bread: A Must-Try Recipe

Soft and Chewy Crusty Italian Bread: A Must-Try Recipe

Soft and chewy, crusty Italian bread is a delight once you’ve mastered the art of baking it. That thick, crunchy yet chewy crust paired with a moist, soft interior—it’s what dreams are made of!

Cultural Significance of Italian Bread:

Crusty Italian bread is deeply embedded in Italian culture, where bread holds a sacred place at the dining table. Throughout history, Italian bread has symbolized sustenance, community, and tradition. Families gather around crusty loaves to share meals, dip into olive oil and balsamic vinegar, or sop up rich pasta sauces. It’s not just a food item but a cultural emblem that connects generations through its timeless appeal and artisanal craftsmanship.

Regional Varieties:

Italy’s diverse regions boast a spectrum of bread varieties, each with its unique characteristics. From the chewy ciabatta of Tuscany to the hearty pane di Altamura from Puglia and the airy focaccia of Liguria, Italian bread showcases regional ingredients and baking techniques. Crusty Italian bread, often characterized by its rustic appearance and robust flavor, varies in shape and texture across the country, reflecting local culinary traditions and agricultural practices.

What Took You So Long?

My family enjoys the basics: sandwich bread, rolls, flatbread, pizza, and sweet treats. While I experiment with special loaves like jalapeno and cheddar sourdough, they prefer simple pleasures. Cinnamon rolls? They’re all in. But what they truly crave is plain, fluffy bread with a soft crust.

This rustic Italian bread is different—it features larger holes and a soft, almost chewy crumb encased in a thicker, crunchy crust. Perfect for dipping into soups or pairing with pasta as garlic bread.

Inspirational Friends

My friends Eric and Lisa were eager for this crusty Italian bread after seeing a video using refined all-purpose flour. I adapted my approach, like preheating the Dutch oven and extending baking time even after the bread reaches 190°F, which helps remove excess moisture and enhances texture. I expect to refine this recipe further, but it’s already a winner.

If you’re short on time for stretch and folds, mix the rustic Italian bread dough in a mixer and refrigerate until convenient. Preheat the oven, possibly perform one set of stretch and folds, then bake—the process is mostly hands-off.

Baking without a Dutch oven (AKA Open Bake):

Special thanks to Monique from Lovely Bell Bakes for sharing her method of shaping and baking this Italian bread recipe without a Dutch oven:

  • Preheat oven to 450°F with a baking steel or pizza stone inside. Place a metal pan on the bottom rack and pour in boiling water once preheated.
  • Place loaves on parchment paper, score them, then place in the oven and generously spray with water before closing.
  • Bake at 450°F for 20 minutes, remove the water pan, then bake at 425°F for an additional 20 minutes.

Monique also shared a helpful video demonstrating shaping techniques for this high hydration crusty Italian bread dough.

Shaping high hydration dough

Soft and Chewy Crusty Italian Bread: A Must-Try Recipe

Crusty, Rustic Italian Bread without Vital Wheat Gluten

If you’re in the mood for a super soft daily bread, try our Basic Bread Dough recipe. Never baked bread before? Check out my guide on The Freshly Milled Bread Method.

Italian Bread (fresh milled)

Just Mill It
Makes: 1 loaf / 16 slices Prep Time: 1 hour 55 minutes (mostly inactive) Bake Time: 50 minutes Total Time: 2 hours 45 minutes
No ratings yet
Prep Time 1 hour 55 minutes
Cook Time 50 minutes
Total Time 2 hours 45 minutes
Course Bread
Cuisine Italian
Servings 16 slices
Calories 95 kcal

Ingredients
  

Instructions
 

  • Mix together all ingredients EXCEPT the yeast for 5 minutes, in mixer or by hand. It will be wet and sticky!
  • Let the dough rest 15 – 30 minutes to better absorb the liquids.
  • Sprinkle the yeast into the dough, and mix or knead for another 3 minutes
  • Transfer the dough into an oiled bowl with plenty of room to rise and a lid.
  • Every 30 minutes, do a set of stretch and folds (optional if using a mixer)
  • After the 3rd set of stretch and folds, preheat your oven and your dutch oven, by setting the oven to 420 F.
  • Once the oven gets to temperature, quickly remove the dutch oven and close the door.
  • Sprinkle flour to line the bottom of your dutch oven, then gently place the dough into it, and sprinkle the top of the loaf with flour.
  • Score the top of the loaf with a sharp knife, razor, or snip it with scissors
  • Place the lid on your dutch oven, and put it into the oven for 30 minutes
  • Remove the lid and lower the oven temperature to 400 F, baking for another 20 minutes
  • Remove from the oven, and place on a cooling rack with air flow all around the loaf
  • Allow to cool before slicing

Video

Notes

If you want to keep crunchy crust, store on the counter or in a paper bag once fully cooled.

Nutrition

Serving: 54gCalories: 95kcalCarbohydrates: 20gProtein: 5gFat: 0.4gSaturated Fat: 0.01gPolyunsaturated Fat: 0.01gMonounsaturated Fat: 0.02gSodium: 293mgPotassium: 6mgFiber: 4gSugar: 0.4gVitamin C: 0.001mgCalcium: 15mgIron: 1mg
Keyword chewy bread, crunchy crust, lean dough
Tried this recipe?Let us know how it was!
Freshly Milled Basic Bread Dough: A Beginner’s Guide

Freshly Milled Basic Bread Dough: A Beginner’s Guide

Learn how to good daily loaf, moist and delicious, yet with no extra sugar or fat added.