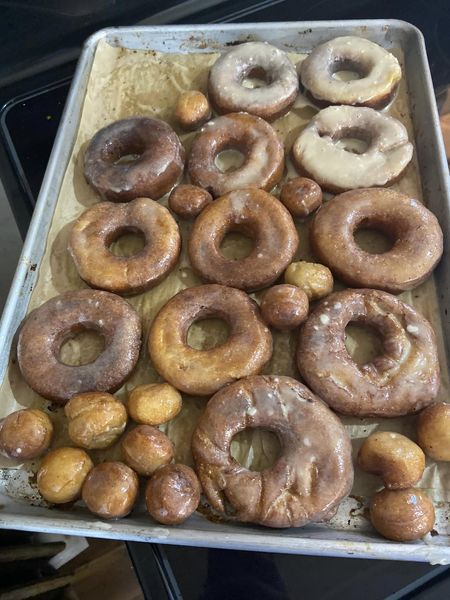
Glazed Donuts
Hey there donut lovers! Did you know you can whip up amazing glazed donuts right at home using your favorite enriched dough? It’s true!
This morning, we embarked on a delicious mission to cheer up Sissy and Daddy with homemade glazed donuts. Eli even said they beat Susan’s – a huge win in our book (though we admit, comparing fried donuts to cake donuts might be a tad unfair!).
Eli, my little kitchen assistant, took charge of cutting, mixing the glaze, and mastering the art of glazing, while I tackled rolling out the dough and, well, a minor burn mishap (those frying adventures can get intense!). Shout out to Pop Pop’s trusty old Wagner cast iron pot – turns out, it’s a versatile hero in our kitchen adventures.
Oh, and did I mention these aren’t your average donuts? They’re 100% whole grain fresh milled delights. Eli even milled the flour himself – future miller in the making, perhaps?
If you’re craving a fun baking project that yields deliciously wholesome results, give our homemade glazed donuts a try. Your taste buds (and your family!) will thank you.
Ready to dive into the deliciousness? Check out our easy-to-follow recipe below!
Recipe: Homemade Glazed Whole Grain Fresh Milled Donuts
Easy Donuts
Equipment
- Mixer or danish dough whisk, or spatula
- gram scale saves on dishes, more accurate than cups and spoons
Ingredients
- 510 g wheat berries, soft white
- 340 g water
- 50 g sugar
- 50 g butter olive oil can also be used
- 33 g water, boiling
- 12 g yeast (instant)
- 6 g sea salt, celtic grey
- ⅛ tsp vitamin c powder optional
Glaze
- ½ cup powdered sugar
- 1 tsp milk more or less depending on your preference
Instructions
- Mill the flour on the finest setting for your mill.
- Make the Yudane: mix 17 g of flour (2 tbsp) and mix it with the 33 g of boiling water in a small dish.
- Add water, Yudane, and sugar to a mixing bowl and begin mixing on low speed.
- Slowly add the remainder of flour to the mixing bowl as it spins, being careful to keep hands and utensils out of the mixing bowl, and let mix for about 5-7 minutes.
- Sprinkle the yeast, salt, and vitamin c into the dough, and let it mix for another few minutes until a windowpane consistency has been reached. This is done by turning off the mixer, and gently and slowly stretching the dough to see if light can be seen through it before breaking. If so, you’ve reached windowpane, and can move on. If your dough looks tough or dry, you can slowly drizzle water in during the mixing until it is a consistency you like.
- First Rise (optional): Let the dough rise, covered, until doubled.
- Punch down the dough doesn’t mean literally punch it, but you can if you like. Gently pull up on one side of the dough, and gently press it into the center of the dough ball. Turn the bowl by a quarter, and repeat until you’ve done this 4 times. This helps ensure a consistent dough temperature.
- Roll out dough to 1/2 inch thick, and cut with a biscuit cutter. If you've got a smaller circle cutter, use that to cut out the holes. Alternatively, make a whole batch of donut holes with a shot glass or 1" diameter cutter. My favorite!
- Heat oil in a pan on the stove, with plenty of room for the oil to rise when you drop the dough into it. Heat the oil to 375 F. I used grass fed beef tallow. You use what you like.
- Lower one or two donuts at a time to the hot oil, making sure to MAINTAIN 375 F so your donuts cook but don't get soggy from the fat. Let them cook until they darken in color. If they are a light golden brown like donuts from the store, they are NOT done. Whole grains cook darker. They won't be burnt, they will be delicious.
- Set the cooked donuts on a baking sheet, and dip into or drizzle glaze over them. You could also roll them into a mixture of cinnamon and sugar, one of my faves. Powdered sugar is another option! If you know how to melt chocolate, you could dip them partially into that. So many options!
- Let cool, and enjoy! I don't blame you if you eat some hot.