Mixing & Kneading Bread Dough (Fresh Milled Flour)
Mixing and kneading are where bread dough becomes bread dough.
This is the stage where ingredients turn into structure—where gluten develops, strength builds, and the dough becomes capable of rising well and holding its shape in the oven.
If you’re using my 📘 Beginner’s Bread Dough Recipe Base, hydration is already correctly adjusted for freshly milled flour. That means you can focus on technique, not fighting dry or overly stiff dough.
Mixing the Dough
Mixing is simply the act of bringing all the ingredients together into a cohesive dough.
At this stage, the goal is:
full hydration of the flour
even distribution of ingredients
no dry pockets or unmixed areas
Fresh milled flour absorbs water quickly and continues absorbing as it rests. Early in mixing, the dough may look rough or uneven—that’s normal. Structure comes with time and movement.
Mix until everything is evenly combined before moving on to kneading.
Proving the Yeast (If Using Active Dry Yeast)
If you’re using active dry yeast, it should be proven before mixing.
Stir the yeast into warm (not hot) water and wait a few minutes. If it becomes foamy, the yeast is alive and ready to work. If it doesn’t react, replace it before continuing.
If you’re using instant yeast or sourdough starter, this step isn’t necessary.
Incorporating Yudane (Optional, But Supportive)
Some recipes include Dr. Mel’s Quick, No-Wait Yudane, which gelatinizes a small portion of flour using boiling water, then cools it immediately with cold liquid.
Yudane supports mixing and kneading by:
improving moisture retention
strengthening dough structure early
reducing crumbliness in whole-grain bread
If your recipe includes yudane, it gets mixed in along with the other liquids—it works with gluten development, not instead of it.
💡 Learn more about Yudane here:
https://justmillit.com/yudane-made-simple/
Kneading: What You’re Actually Doing
Kneading aligns and strengthens gluten strands so the dough can:
stretch without tearing
trap fermentation gases
rise properly in the oven
With freshly milled flour, gluten development is absolutely possible—but it requires:
enough hydration (already handled in the recipe base)
enough time and movement
Kneading isn’t about forcing the dough. It’s about giving gluten the conditions it needs to organize.
Kneading with a Stand Mixer
A stand mixer can knead fresh milled dough very effectively when used correctly.
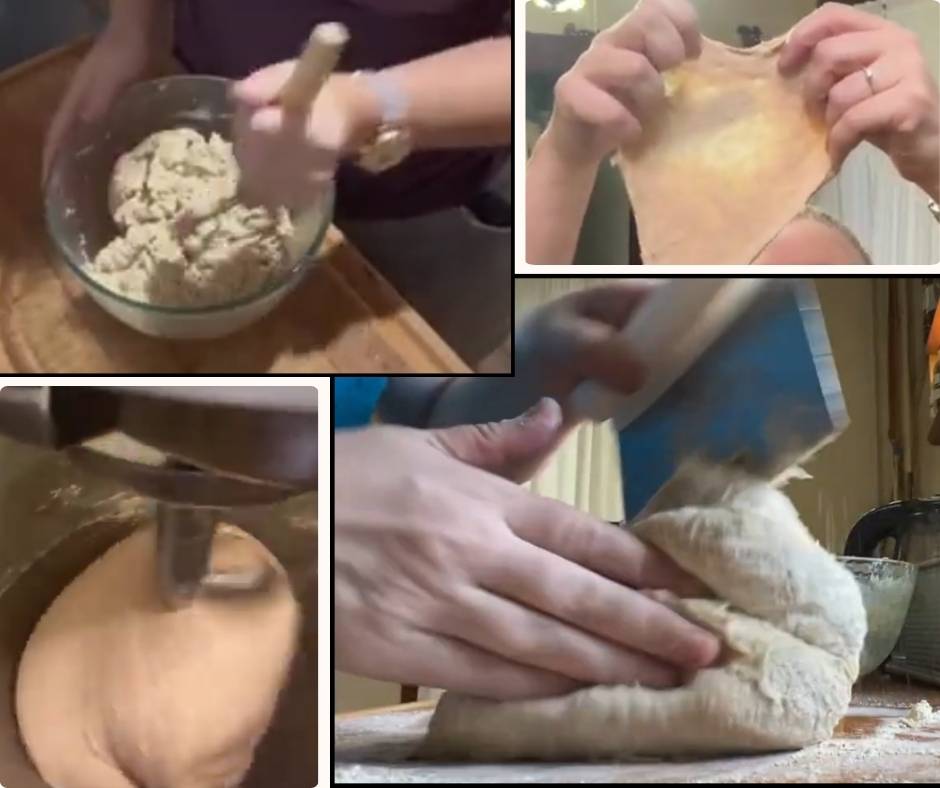
Start on low speed until the dough comes together. Then increase slightly and knead steadily. Avoid high speeds, which can:
overheat the dough
stress the mixer
break down gluten instead of strengthening it
Properly hydrated dough should become smoother, stronger, and more elastic as kneading continues.
Hand Kneading Method
Hand kneading gives you direct feedback from the dough.
Use gentle stretching, folding, and turning rather than aggressive pushing. A bench scraper helps manage stickiness without adding excess flour.
As kneading progresses, you should feel the dough:
tightening
becoming more elastic
holding together instead of tearing
Stickiness early on is normal. Strength develops with time.
The Windowpane Test (Whole Grain Should Pass)
There’s a persistent myth that whole grain or fresh milled dough can’t pass the windowpane test.
That’s incorrect.
A properly hydrated, well-kneaded whole grain dough absolutely should form a strong windowpane.
If your dough doesn’t windowpane, the issue is almost always:
insufficient hydration
insufficient kneading
or both
Not the flour itself.
Fresh milled hard wheat absorbs about 17% more water than typical store-bought bread flour. When hydration isn’t adjusted, the dough becomes too stiff to develop gluten efficiently. This is why people struggle—and why mixers get overworked.
With hydration already corrected in the recipe base, kneading should lead to a dough that:
stretches thin without tearing
feels elastic and resilient
holds together instead of cracking
That strength is essential for good fermentation, oven spring, and crumb structure.
Troubleshooting Dough That Feels Wet or Sticky
If the dough feels sticky during mixing or kneading, pause before adding more flour.
Fresh milled flour continues absorbing water as it rests. A short rest allows:
hydration to even out
gluten to relax
handling to become easier
Often, time—not flour—is the solution. If your dough still feels too wet after the first rise, we take action then.
Using a Bread Machine
If you use a bread machine, the dough cycle works well for mixing and kneading.
You can allow the machine to handle the initial work, then remove the dough and continue the process by hand. This approach combines convenience with better control. I don't really cover bread machine methods, even though I've used them before. They are too temperamental and break my practicality rule.
Why Mixing & Kneading Matter
Mixing and kneading set the stage for everything that follows.
Strong, well-developed dough:
ferments more predictably
rises better
bakes with better structure and crumb
When hydration is correct and technique is sound, fresh milled dough is not harder to work with—it’s simply more honest.
Related Articles
Join our Online Community
Ready to ditch recipes and learn more about baking with fresh milled flour using methods and your imagination? Join my Fresh milled Flour Methods group. You can ask questions, share your wins, and more with an expectation of honesty and friendly interaction. I hear it’s the best place to be on Facebook.
